Risk dashboard
In this section:
Risk dashboard is a real-time status of an organization’s projects and their compliance with their assigned risk policies. This status is identified at the business unit, application, and project levels for instant and effective risk reporting.
The risk policies are maintained by SD Elements administrators: a default policy is set for an organization and for each business unit. These defaults are pre-selected at the time of project creation but they can be overridden to better match a project’s needs.
A risk policy is composed of a scope, or policy inclusion, and an accepted risk criteria:
-
The scope identifies which project tasks are subject to the policy.
-
These tasks are referred to as risk-relevant tasks.
-
The scope is defined by a set of phases, a range of task priorities and a list of task tags.
-
-
The acceptable risk criteria is a short-list of task statuses.
-
Tasks in scope for a policy must be assigned one of these statuses to be considered compliant.
-
A project is considered compliant if all the tasks in scope for its risk policy meet the criteria.
|
|
By default the project tasks view restricts its list to risk-relevant tasks only. Users may override the option to view all tasks. |
Rules when risk policies apply
Risk policies and their definitions are maintained by SD Elements administrators. A risk policy can be selected at the organization and business unit levels to guide teams on a selection. However, it is up to individual teams to assign the most relevant policy to their projects.
Organization default policy:
-
The risk policy is set as the default for all business units. This can be overridden by each business unit. Refer to section Set a default risk policy for further guidance.
Business unit default policy:
-
The risk policy selected by default for all new projects in the business unit. This can be overridden by each project team. Refer to the section covering business units for further guidance.
Project policy:
-
The risk policy assigned to a project. Project teams are responsible for selecting the policy applicable to their project context. Risk status in the organization is governed by the policies assigned to projects and their fulfillment. Teams assign a risk policy during project creation or during an update. Refer to the section covering projects for further guidance on project creation and update.
Risk policy details
The following details are defined in a risk policy:
-
Name: The name of your risk policy. This name will appear in all risk status reports.
-
Description: A brief explanation of the risk policy.
-
Policy Inclusion: The tasks to be included in the risk policy. Select tasks by the phases they belong to. Phases you do not select will not include any tasks associated with those phases in the risk policy.
-
Tasks of priority: Select the priority of the tasks to be included in the risk policy.
-
Priority describes how important a task is compared to other tasks and ranges from 1 to 10.
-
A priority or 7 above, for example, can be considered as a minimum priority.
-
-
Restrict to tasks with any of the following tags: The tasks to be included in the risk policy based on their tags. The risk policy only includes the tasks with the tags defined here.
-
Minimum Criteria for Acceptable Risk: The standard tasks must adhere to in order to be considered compliant.
-
Tasks with status: The status required for a task to be considered compliant. Choose from Not Applicable, Incomplete, and Complete.
-
All risk policies can be viewed from the Manage→Risk policies menu.
Default risk policies
By default, SD Elements provides two risk policies On-boarding policy and Highest-risk policy. The On-boarding policy is marked as the organization default.
On-boarding policy (default):
-
In scope: all tasks from Requirements and Development, with priority 7 and higher.
-
Criteria for acceptable risk: all tasks in scope must be assigned status Complete or Not applicable.
Highest risk policy:
-
In scope: all tasks from all phases
-
Criteria for acceptable risk: all tasks in scope must be assigned status Complete or Not applicable.
These policies can be modified or deleted according to the guidance below.
Create a new risk policy
Define a risk policy for your organization using the steps below.
Prerequisites:
-
Users require the permission Global Roles → Administration → Manage Risk Policies.
Steps:
-
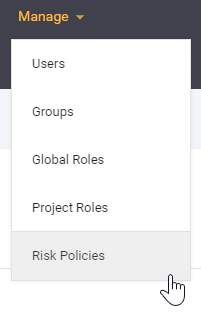
Click Manage in the menu and select Risk Policies.
-
Click on the yellow icon in the top right to create a New Risk Policy.
-
Enter and select the details of your risk policy.

-
Click on Create.
The new policy is added to your list of existing risk policies. You can set it as your default policy by selecting the radio button under the Default column.
Update a risk policy
Change the details of an existing risk policy using the steps below.
Prerequisites:
-
Users require the permission Global Roles → Administration → Manage Risk Policies.
Steps:
-
Click Manage in the menu and select Risk Policies.
-
Search for the policy using the interface.
-
Hover your mouse over the row on the far right and select the Edit risk policy mode_edit icon. A dialog will appear.
-
Update the details of the policy.
-
Click on Done.
The policy is updated immediately and the application subsequently re-calculates the risk status of affected projects. This process may take a few minutes to complete. Once completed, all risk reporting will reflect the details of the updated risk policy.
Set a default risk policy
Change the default organization risk policy using the steps below:
Prerequisites:
-
Users require the permission Global Roles → Administration → Manage Risk Policies.
Steps:
-
Click Manage in the menu and select Risk Policies.
-
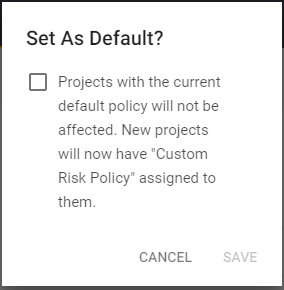
Click the radio button of the policy you wish to make the new default.
-
Acknowledge the warning:
-
Click on Save.
The selected policy is now the organization’s default, and will automatically be selected by default for new business units. The change will not affect existing business units or projects.
Delete a risk policy
Delete an existing risk policy using the steps below.
Prerequisites:
-
Users require the permission Global Roles → Administration → Manage Risk Policies.
Steps:
-
Click Manage in the menu and select Risk Policies.
-
Use the search function if you need to find the policy in the list.
-
Hover your mouse over the row on the far right and select the trash can icon. A dialog will appear.

-
Select a policy to assign to any projects that are currently assigned to the policy you are removing.
-
Click on Delete.
The risk policy is deleted immediately. Affected projects are assigned to its replacement and their risk status is re-calculated.
View risk status from the user interface
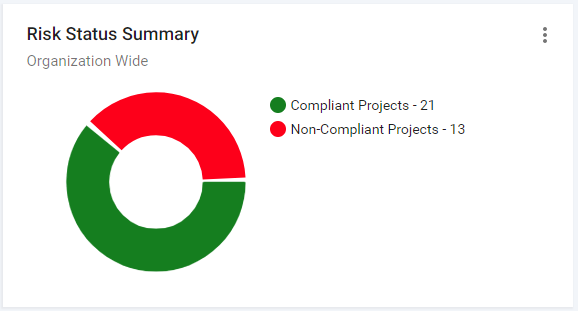
The SD Elements dashboard provides a Risk Status Summary widget that highlights the total number of compliant and non-compliant projects in your business units.
Business unit risk reporting
From the dashboard, you can jump to Business Units to view their risk compliance status.

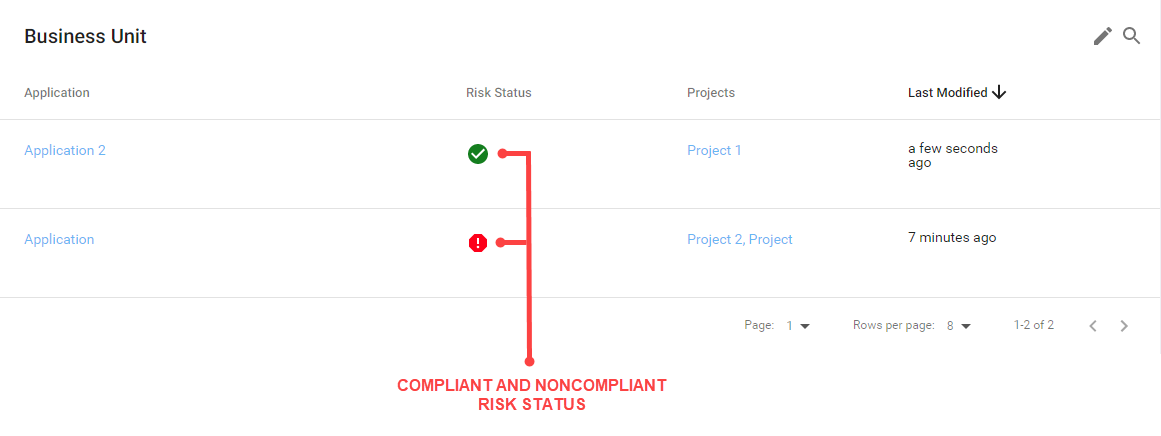
Application risk reporting
Select a business unit from this list to view the risk compliance status of its applications.
Project risk reporting
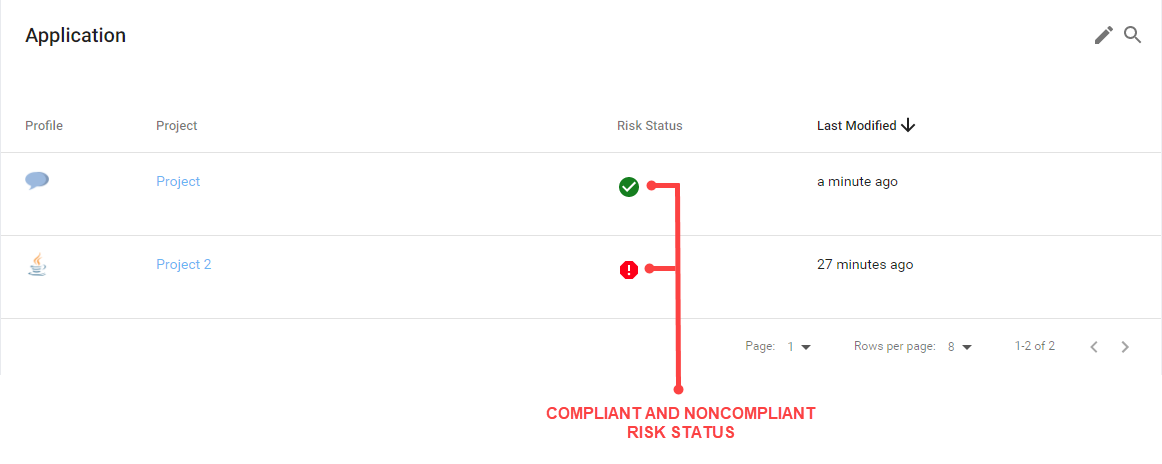
Select an application from this list to view the risk compliance status of its projects.
Risk reporting
Generate reports of your business units and projects to summarize their risk compliance.
-
Generate a risk status summary report for all business units.
-
The report summarizes the development progress across all of your business units. This report provides a synopsis of each business unit and any non-compliant projects within that unit. Use this report for a snapshot of your organization’s risk compliance, development progress, and development accountability.
-
-
Generate a project report for a project-specific view of risk status.
-
The report summarizes the details of a project, its risk policy, and any outstanding non-compliant tasks. Use this report for an overview of a project’s development and risk compliance status.
-