Manage groups
In this section:
Groups are a way of organizing users and assigning permissions.
SD Elements allows system administrators to easily organize a collection of users into a logical group that can be treated as a single entity when assigning permissions, such as the ability to add or delete projects. The resulting permissions will be the combination of that user’s specific permissions, plus any permissions that the user will inherit from being a member of the group.
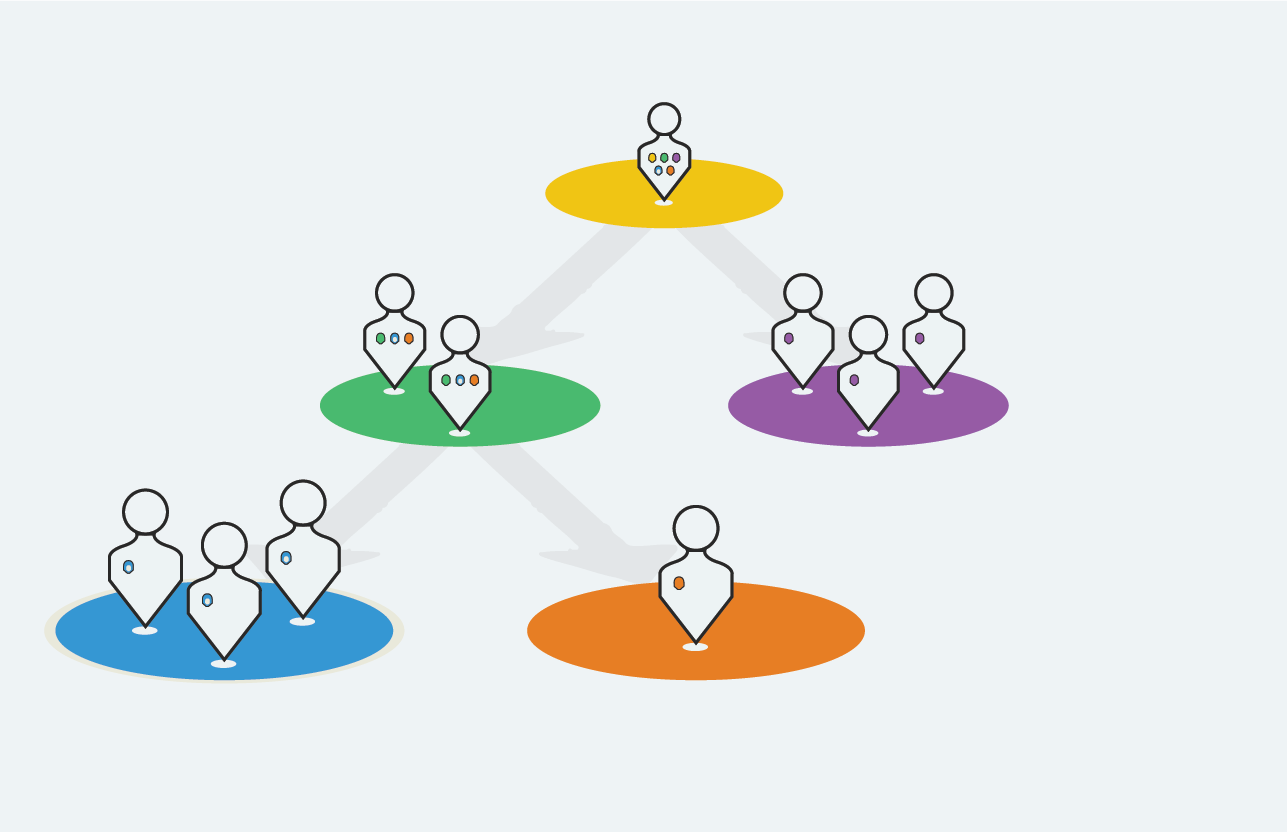
Since permissions are inherited, it is helpful to think of your organization hierarchy as an upside down tree. In this tree, each branch/node represents a group and each member of the group inherits the role defined by the group. Furthermore, each member of a group also belongs to the groups below it. Access limitation is achieved by controlling the membership of the group. As such, the more groups an entity (individual or group) is assigned to, the more access that entity will inherit.
Group details
A group has the following fields:
-
Name: The name of the group.
-
Description: You can provide details about the group if the name is not descriptive enough.
-
Global role: The Global Role to assign to all member users and groups.
-
Members: The group’s membership composed of users and groups.
Create a group
Similar to creating a user, a group takes a name, description and role. As stated above, the role determines the permissions that all members of the group will inherit. You can select the users and groups to be added to the group by entering the name in the "Members" field. This will provide a drop-down list of users and groups that match the name you entered. When adding groups to your group, be aware that you’re adding every member of that group to this one, including those in groups added to that group.
Prerequisites:
-
The user has the permission Global role → User Management → Manage users & groups.
Steps:
-
Open the Manage→Groups page. Click the plus add_circle button on the right.
-
Fill in the required fields.
-
Click Create.
Once a user group is created it can be used immediately.
Update a group
You can update the details and membership of a group. A user or group that is removed from a group loses any permissions and roles they were granted from their membership in that group. They will still have the permissions that were granted from other sources (other group memberships and their own user role).
Prerequisites:
-
The user has the permission Global role → User Management → Manage users & groups.
Steps:
-
Open the Manage→Groups page
-
Use search to find the group. Click its name.
-
Modify the group and click Done.
Changes to the group take effect immediately.
Delete a group
Delete a group from the system using the steps below.
Prerequisites:
-
The user has the permission Global role → User Management → Manage users & groups.
Steps:
-
Open the Manage→Groups page.
-
Use search to find the group.
-
Hover your mouse over the row on the far right and select the trashcan delete icon.
-
Acknowledge the warning.
-
Click Delete.
The group is deleted, and any references to it are updated immediately.