Projects
In this section:
A project tracks the tasks and best practices needed to secure an application release. Project tasks are identified based on the survey answers provided by a project user. Survey answers influence the risk profile of a project, prompting SD Elements to add compensating controls to a project’s task list. As a team completes tasks, a project’s underlying threats and problems are mitigated in the release.
The first project of an application is called a Root Project or Base Project. Subsequent projects are "Release Projects" because they are made using the "New Release" action.
Project details
A project has the following properties:
-
Profile: The project type defined at the time the project is created.
-
Name: A concise description of the project. For example, the version of the application release.
Special characters in project names may be removed during slug creation. Use alphanumeric, underscore, and hyphen characters for creating unique project names. -
Description: A way to detail the release to other users.
-
Risk policy: The policy outlining the set of tasks the project must complete to meet desired risk levels.
-
Custom attributes: (Optional) An additional set of attributes customized by an administrator. See Project attributes for more information.
-
Tags: Custom labels assigned to the project to help identify the release.
-
Members: The names of the users and groups in your system that have access to this project. Users and groups are assigned a different Project role to control their access rights.
-
Tasks Remaining: The number of tasks across all phases and priority groupings that are in an incomplete state.
A project is composed of the following main areas:
-
Project activity: A list of activities performed by users.
-
Project survey: Details about project scope that affect which tasks and requirements are included in a project. This includes technology, features, and dependencies.
-
Project tasks: The list of tasks and security requirements identified for the release.
-
Project reports: Reports that communicate the status of a project from the point of view of risk, completion, compliance, and so on.
-
ALM integration: Sync project tasks with bug tracking and ticketing systems.
-
verification integration: Import vulnerability and risk data from security tools to affect the verification and completion status of project tasks.
View a project
To view a project, follow the steps below.
Prerequisites:
-
The user:
-
Is a member of the project and has the permission Project Roles→Project Management→View Project OR
-
Is a member of the project’s business unit and has the permission Global Roles→Administration→View all projects.
-
Steps:
-
Open the Business Units→All menu option.
-
Select the business unit where the project’s application is assigned.
-
Use search if you need to find the application in the list.
-
Select the application where the project is assigned.
-
Use search if you need to find the project in the list.
-
Select the project.
The project’s task list loads.
Tag a project
Assign a custom tag to a project by following the steps below.
Prerequisites:
-
The user:
-
Is a member of the project and has the permission Project Roles→Project Management→Edit project details OR
-
Is a member of the project’s business unit and has the permission Global Roles→Administration→View all projects.
-
Steps:
-
Navigate to the project’s application.
-
Hover over the project, and it will display the tags widget.
-
Enter one or more tags, and each tag will be added in sequence.
-
The widget auto-completes partially entered tags.
-
Ignore a suggestion by pressing the escape key.
-
The selected tags are assigned to the project. The tags can be used to filter projects in a list.
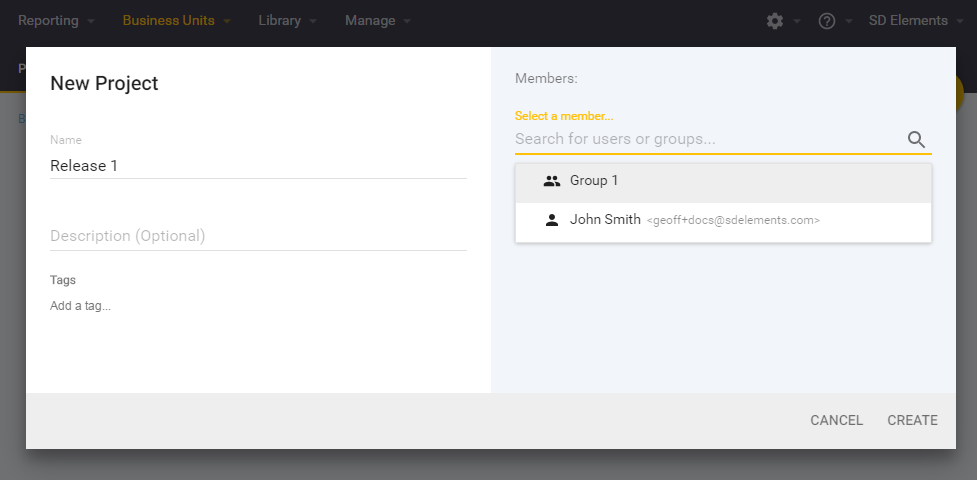
Create a new project
To create the first project of an application, follow the steps below:
Prerequisites:
-
The user is a member of the business unit.
-
The user has the permission Global Rules→Project Management→Add Project.
Steps:
-
Open the Business Units→All menu option.
-
Select the business unit where the application is assigned. The business unit’s list of applications loads.
-
Use search if you need to find the application in the list.
-
Select the application where the project should be assigned. The application’s list of projects loads.
-
Click the plus add_circle button.
-
The New Project dialog opens:
-
Enter the project details outlined above.
-
-
Click Create.
Once the project is created, you will immediately be prompted to Select a profile and then answer the Project survey.
Select a profile
Follow the steps below to select a profile.
Steps:
-
Choose a profile appropriate to the new project:
-
The settings can be changed or fine-tuned later.
-
Select No Profile to begin with an empty set of project settings.
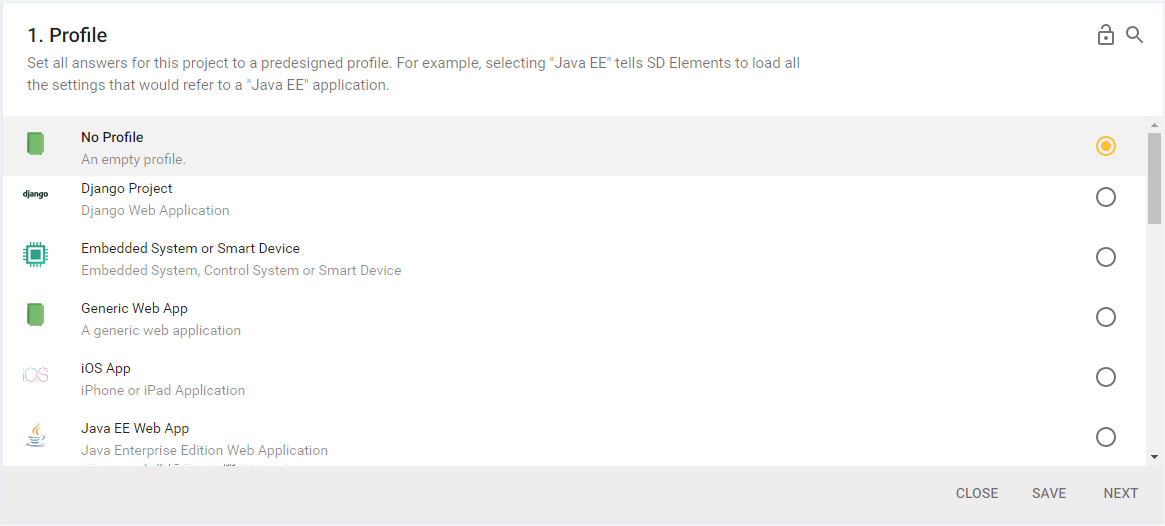
-
-
Click Select and continue to project survey.
The project settings are reset according to the selected profile.
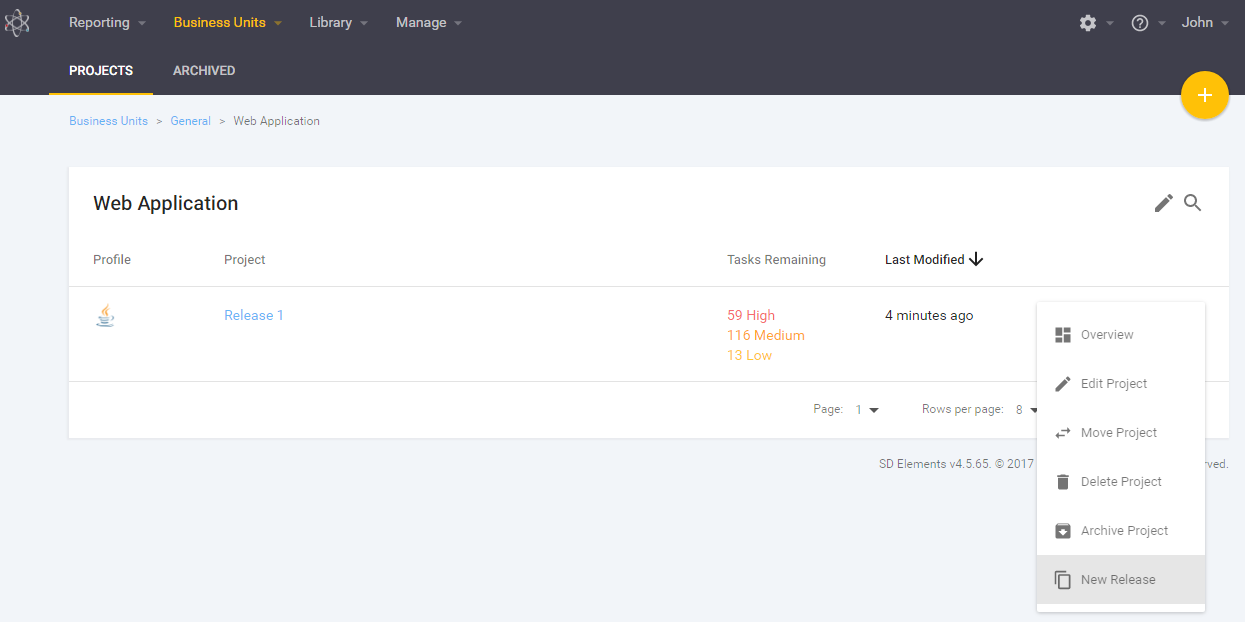
Create a release project
Release projects have the following advantages compared to a new project.
Advantages of a release project:
-
No need to re-enter project settings: The new release keeps a record of the original project’s settings, removing the need to re-enter them again.
-
Fewer requirements to action: Release projects identify only those tasks that need attention based on what has changed in the release.
-
ALM and Scanner connections can be copied: Carry forward ALM and scanner integration settings, reducing the amount of duplicated setup.
-
Carry forward tasks and their details: Task status and notes from the original project can be copied to the new release.
To create a release, follow the steps below:
Prerequisites:
-
The user:
-
Is a member of the project and has the permission Project Roles→Project Management→Add Project OR
-
Has the permission Global Roles→Administration→Edit all projects.
-
Steps:
-
Open the Business Units→All menu option.
-
Select the business unit where its application is assigned.
-
Use search if you need to find the application in the list.
-
Select the application where the original project is assigned.
-
Use search if you need to find the project in the list.
-
Hover over its row on the far right, click more_vert and select New Release. A dialog opens.
-
Enter details for the new project:
-
Name: A concise description of the project. For example, the version of the current application.
-
Description: A way to detail the release to other users.
-
Tags: Custom labels assigned to the project to help identify the release.
-
Advanced (optional):
-
Retain Statuses and Notes in the following Phases - Select the phases from which tasks, their statuses, and notes should be carried forward.
-
Project Specific Tasks Retention - Carry forward Project Specific Tasks to the new release.
-
ALM Connection Retention - Carry forward ALM connection details to the new release.
-
Verification Connection Retention - Carry forward scanner analysis connection details to the new release.
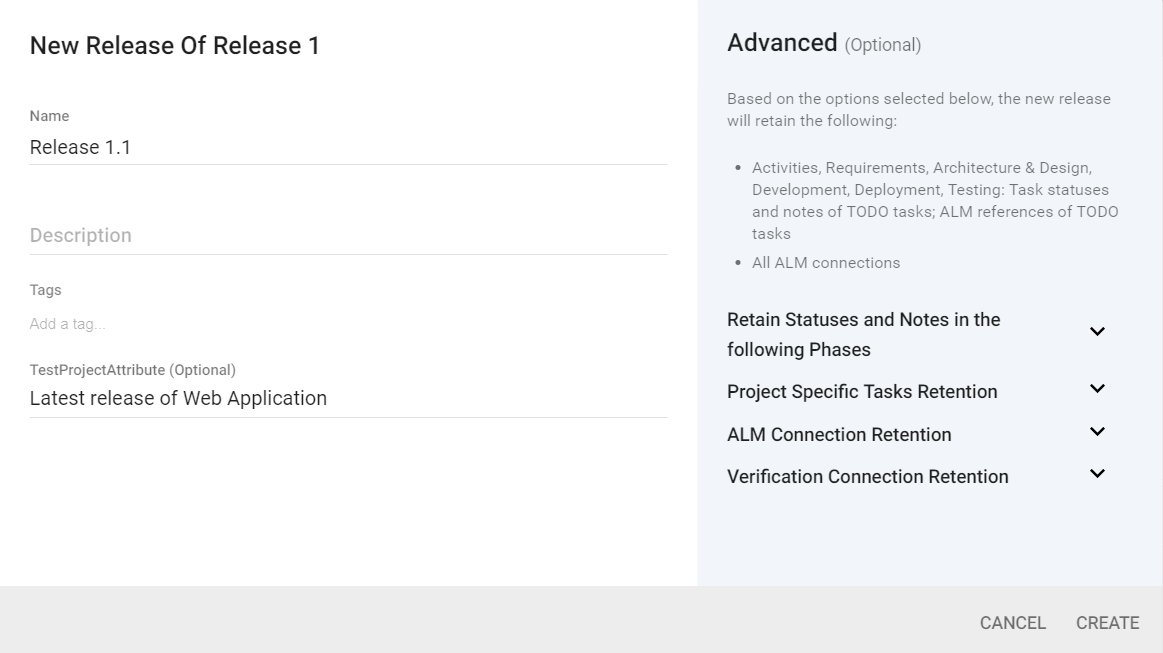
-
-
-
Click Create.
-
The dialog Changes Since Last Release opens. Select the settings relevant to the release. Uncheck the settings that are irrelevant.
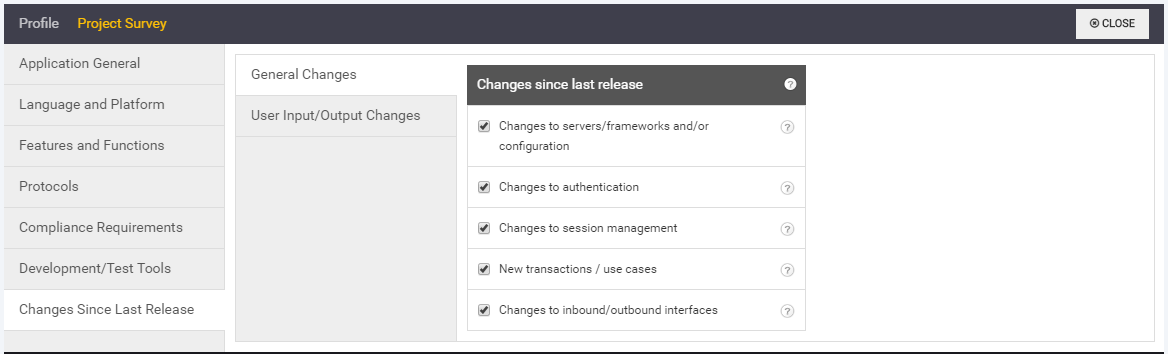
Only uncheck a "Changes since last release" answer if you are certain there have been no changes. For example, uncheck "Changes to user output" only if you are certain that there will be no new web content on a web application. Unchecking answers incorrectly here may result in security tasks not appearing, potentially leading to decreased security in your application. -
Click Save and Close.
Move a project to another application
Move a project to a different application by following the steps below.
Prerequisites:
-
The user is a member of the project.
-
The user has the permissions:
-
Global role→Project Management→Delete project.
-
Global role→Project Management→Add project.
-
Project role→Project Management→View project.
-
Steps:
-
Open the project’s overview page.
-
Click the vertical ellipsis more_vert icon for more options.
-
Select Move Project.
-
A dialog appears. Search for the application to where the project should move.
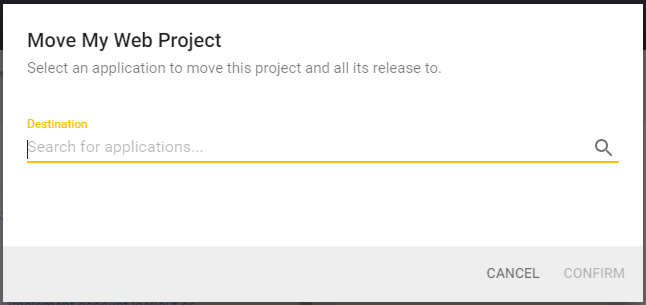
-
Click Confirm.
The project is moved from the source application to the selected application.
Notes
-
If your project has new releases, all of them will be moved to the new application. There is no way to move a subset of them at this time.
-
The "Move" button will only be available to the "root" project, or the project that is not a "new release" of any other projects. If you do not see the "Move" button, it likely means that the project you have selected is a new release of another project.
Archive a project
To archive a project, follow the steps below:
Prerequisities:
-
Users require the permission Global Roles→Project Management→Add project.
Steps:
-
Open the Business Units→All menu option.
-
Select the business unit where its application is assigned.
-
Use search if you need to find the application in the list.
-
Select the application where the project is assigned.
-
Use search if you need to find the project in the list.
-
Hover over the project’s row on the far right, click more_vert and select Archive Project. A dialog opens.
-
Confirm that you understand the impact of the change.
-
Click Archive.
The project and its tasks are archived. The project can no longer be worked on. It can be unarchived later.
Unarchive a project
To unarchive a project, follow the steps below:
Prerequisities:
-
Users require the permission Global Roles→Project Management→Add project.
Steps:
-
Open the Business Units→All menu option.
-
Select the business unit where its application is assigned.
-
Use search if you need to find the application in the list.
-
Select the application where the project is assigned.
-
Select Archived from the top menu under Business Units.
-
Use search if you need to find the archived project in the list.
-
Hover over the project’s row on the far right, click Unarchive. A dialog opens.
-
Confirm that you understand the impact of the change.
-
Click Unarchive.
The project and its tasks are restored to their original state and location.
Delete a project
To delete a project, follow the steps below:
|
|
Deleting a project is permanent. |
Prerequisities:
-
Users require the permission Global Roles→Project Management→Delete project.
Steps:
-
Open the Business Units→All menu option.
-
Select the business unit where its application is assigned.
-
Use search if you need to find the application in the list.
-
Select the application where the project is assigned.
-
Use search if you need to find the project in the list.
-
Hover over the project’s row on the far right, click more_vert and select Delete Project. A dialog opens.
-
Confirm that you understand the impact of the change.
-
Click Delete.
The project and its tasks are permanently removed from the system.
Apply a risk policy to a project
Apply a risk policy for new or existing project using the steps below.
Prerequisites
-
Users require one of the following permissions:
-
Global Roles → Administration → Add project.
-
Global Roles → Administration → Edit all projects.
-
Project Roles → Project Management → Edit project details.
-
Steps:
-
Open the Business Units→All menu option.
-
Select the business unit where the project’s application is assigned.
-
Use search if you need to find the application in the list.
-
-
Select the application where the project is assigned.
-
Use search if you need to find the project in the list.
-
-
On the right of the project whose policy you want to change, select more options.
-
Click on Edit Project.
-
Using the Risk Policy dropdown menu, select a risk policy.
-
Click Done.
The risk policy you select will be applied to that project alone. The project’s list of tasks is updated to show tasks relevant to this risk policy.