
Status Mapping
Table of Contents
SD Elements can be made aware of the various statuses your Issue Tracker tools use for Countermeasure completion. This is possible by mapping statuses you have set up in your Issue Tracker to the statuses that SD Elements uses, and vice-versa.
Once you create these mappings and sync your Issue Tracker to SD Elements (or vice-versa), SD Elements will better reflect the different states of your Issue Tracker’s workflow in Countermeasure lists and reports.
For example, if you use a status called “Done” in your Issue Tracker, you can map it to the SD Elements status of 'Complete'.
SD Elements determines these mappings based on the inherent meanings of statuses. For instance, the status 'Complete' in SD Elements has a meaning of 'Done'. If you map the status 'Issue Tracker-Finished' from your Issue Tracker to the status 'SDE-Complete' in SD Elements, then SD Elements will assign 'Issue Tracker-Finished' the meaning of 'Done'.
| SD Elements will pre-populate custom status mapping fields in their supported issue tracker connections with required SD Elements status mappings on the create form. |
The following table shows how the name of a status in SD Elements has inherent meanings.
Status Mapping details
You can define which statuses in SD Elements are directly mapped to statuses in an Issue Tracker. In other words, you can define your Issue Tracker statuses against the default SD Elements status meanings of 'Done' (Complete), 'To Do' (Incomplete), and 'NA' (Not Applicable).
-
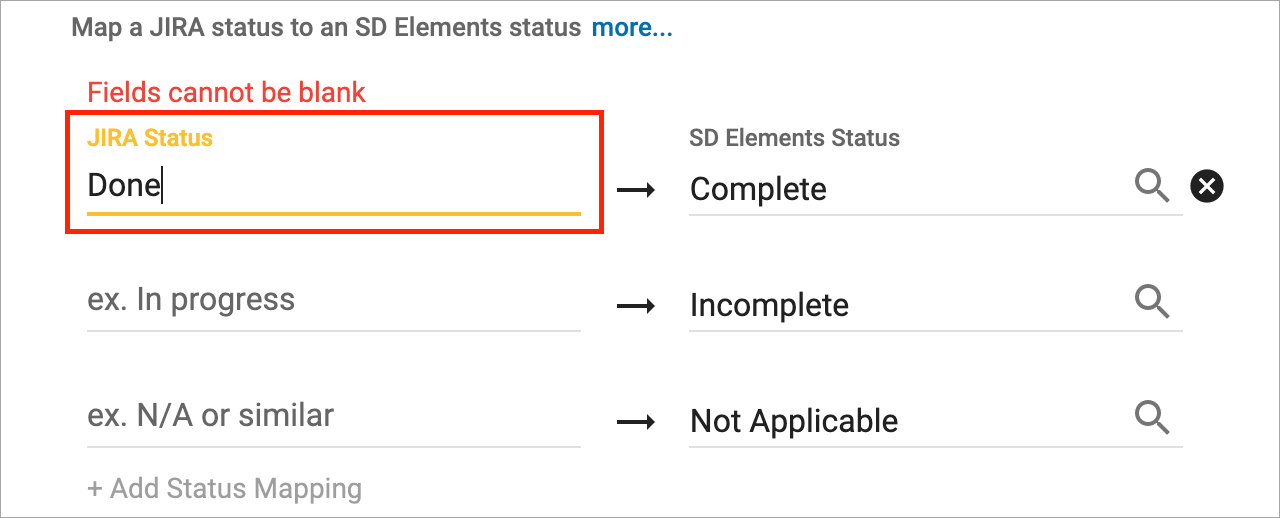
Map a JIRA status to an SD Elements status: The direct mapping between your Issue Tracker to SD Elements.
-
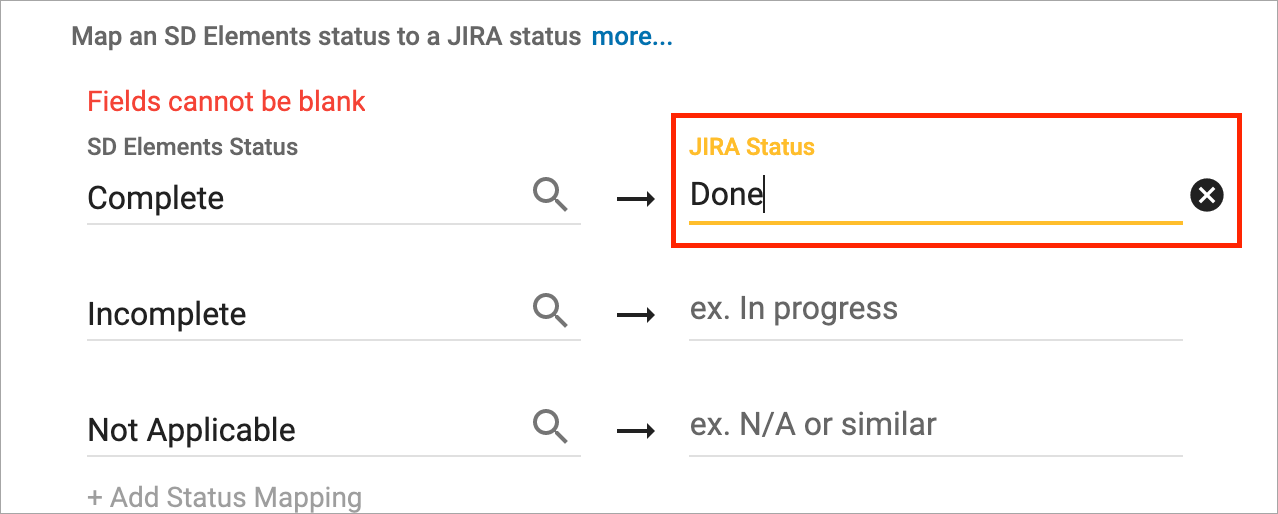
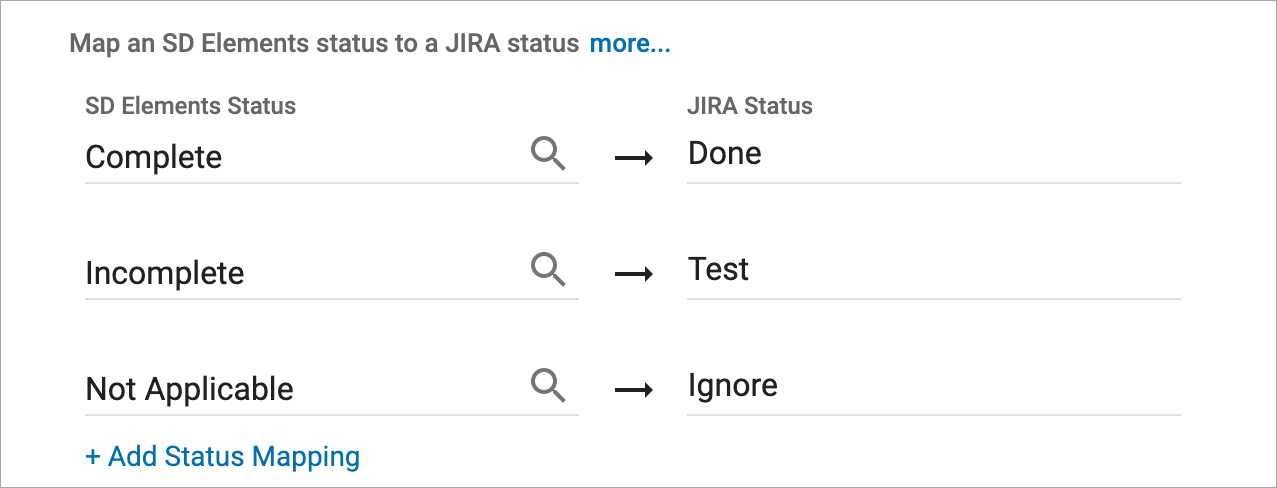
Map an SD Elements status to a JIRA status: The direct mapping between SD Elements to your Issue Tracker.
-
Closed Issue Status: The status that is assigned to a Countermeasure that becomes closed if it falls out of scope of your project. For example, when the project survey is changed and a Countermeasure is no longer relevant to the project, it will be assigned this status.
Legacy system connectors
System connectors created in versions of SD Elements prior to 4.19 are considered legacy system connectors. Syncs using these connectors will continue to work as before, but any updates to them will also require updating their status mappings as though they were a new system connector.
Project connections that use legacy system connectors can continue to be edited. While these project connections will continue to sync, update legacy system connectors for greater control of sync behavior.
Map a status from the Issue Tracker to an SD Elements status and vice-versa
Map an Issue Tracker status to all required meanings in SD Elements before adding any new mappings. The statuses for these meanings are: 'Incomplete', 'Complete', and 'Not Applicable'. This one-to-one mapping allows SD Elements to establish a meaning between the statuses in the Issue Tracker and the statuses in SD Elements. Once these three statuses have been mapped, you can add more using the same instructions.
Prerequisites:
-
The user has the permission Project role→Integration→Edit Issue Tracker connections.
-
The user is familiar with the statuses of their Issue Tracker.
1. Map meanings from the statuses in SD Elements to the statuses in your Issue Tracker
Steps:
-
From the gear icon menu, select Integration.
-
Add a new Issue Tracker connector or edit an existing one. See Add/Edit an Issue Tracker connector for more information.
-
Once the connection is created or you are ready to add a mapping, scroll down to Advanced Issue Tracker Configuration, where Issue Tracker is the Issue Tracker you want to configure.
-
Under Map an SD Elements status to an Issue Tracker status, click on the Issue Tracker Status field and enter the name of the Issue Tracker status.
-
Ensure that 'Incomplete', 'Complete', or 'Not Applicable' have been mapped.
-
-
Repeat the previous steps until the 'Incomplete', 'Complete', and 'Not Applicable' statuses in SD Elements are mapped to statuses in the Issue Tracker.
-
Click on Create or Done to complete the mapping.
The statuses in SD Elements are now mapped to those from the Issue Tracker. SD Elements will use these three mappings by default to treat any unmapped custom statuses.
| This process is not complete. Continue to the next section. |
2. Map meanings from the statuses in your Issue Tracker to the statuses in SD Elements
Ensure that the 'Incomplete', 'Complete', and 'Not Applicable' statuses in the Issue Tracker are mapped to the statuses in SD Elements.
Steps:
-
From the gear icon menu, select Integration.
-
Add a new Issue Tracker connector or edit an existing one. See Add/Edit an Issue Tracker connector for more information.
-
Once the connection is created or you are ready to add a mapping, scroll down to Advanced Issue Tracker Configuration, where Issue Tracker is the Issue Tracker you want to configure.
-
Under Map an Issue Tracker status to an SD Elements status, click on the Issue Tracker Status field and enter the name of the Issue Tracker status.
-
Ensure that 'Incomplete', 'Complete', or 'Not Applicable' have been mapped.
-
The Issue Tracker statuses that you enter here in part 2 must match the ones entered in part 1.
-
-
Repeat the previous steps until all Issue Tracker statuses from part 1 have been mapped.
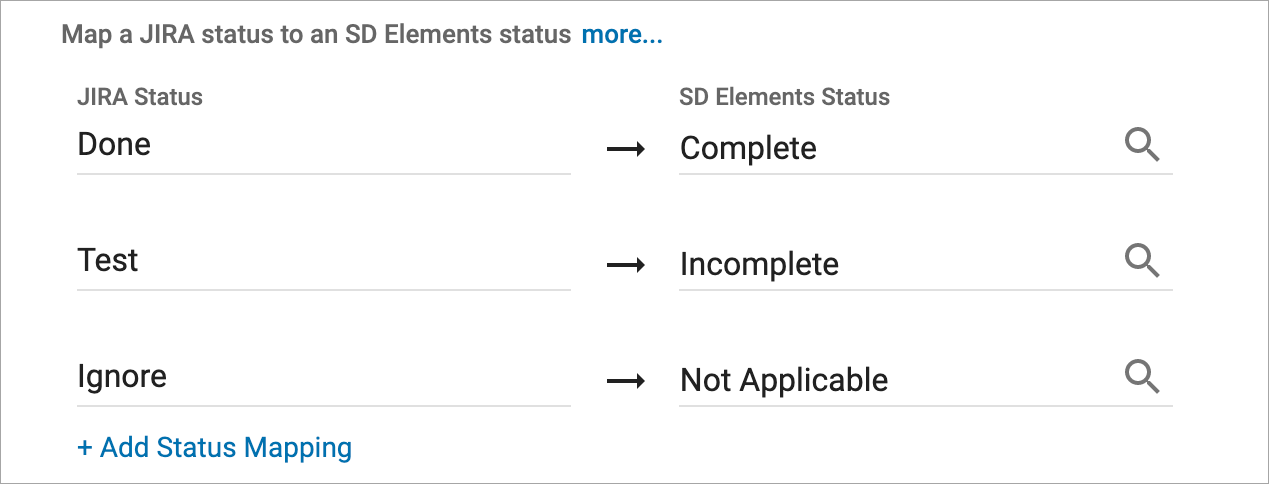
The statuses from the Issue Tracker are now mapped to those in SD Elements. Any Issue Tracker status that is not mapped here will map to an SD Elements status of 'Incomplete' and have the meaning of 'To Do' by default.
Add a Countermeasure status in SD Elements
Steps:
-
From the gear icon menu, select Countermeasure Status.
-
Click on the yellow button called +Add Status.
-
Enter the Slug, Name and Meaning of the status.
-
Optionally, you can check the Default box to make this Countermeasure status the default status for all Countermeasures. Only one Countermeasure can be marked as default.
-
Optionally, you can check the Requires comment box for this Countermeasure to require a comments from the user.
-
-
Click +Add Status.
The new Countermeasure status appears in the Countermeasure status table.