Installation and administration
Table of Contents
Requirements
| It is recommended that you update your installed Remote Integration Agent client after each SaaS upgrade. |
User permissions
The Remote Integration Agent connects to SD Elements using an API token. You can generate the token from a user who has a role with the following permissions:
-
Issue Tracker sync:
-
Manage > Global Roles > Integration > Edit Issue Tracker connections (enable)
-
-
Scanner import:
-
Manage > Global Roles > Integration > Edit verification connections (enable)
-
Manage > Project Roles > Integration > Sync with Issue Tracker tools (enable for each project requiring integrations)
-
Manage > Project Roles > Integration > Verify Countermeasures (enable for each project requiring integrations)
-
-
LDAP Sync:
-
Access the SD Elements server as a user with superuser privileges.
-
Technical requirements
-
Network connectivity to port 443 (HTTPS) on the SD Elements server.
-
Network connectivity to port 443 (HTTPS) on the integration servers.
Configure a Remote Agent in SD Elements
Adding a Remote Integration Agent involves adding it to SD Elements, and installing the agent software on Windows or Linux.
Windows
-
Desktop/Server
-
Minumum specifications:
-
4 GB RAM
-
2 CPU cores
-
Required minimum of 100 MB free disk space
-
16 GB total disk space (recommended setup for environment on Windows 10)
-
Linux
-
CentOS 7 or RHEL 7
-
Minimum specifications:
-
2 GB RAM
-
2 CPU cores
-
Required minimum of 150 MB free disk space
-
10 GB total disk space (recommended setup for environment)
-
Create a Remote Agent entry in SD Elements
Steps:
-
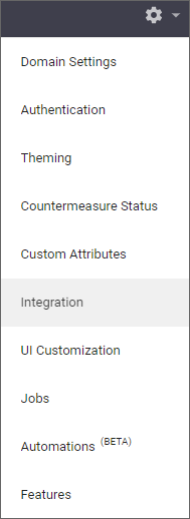
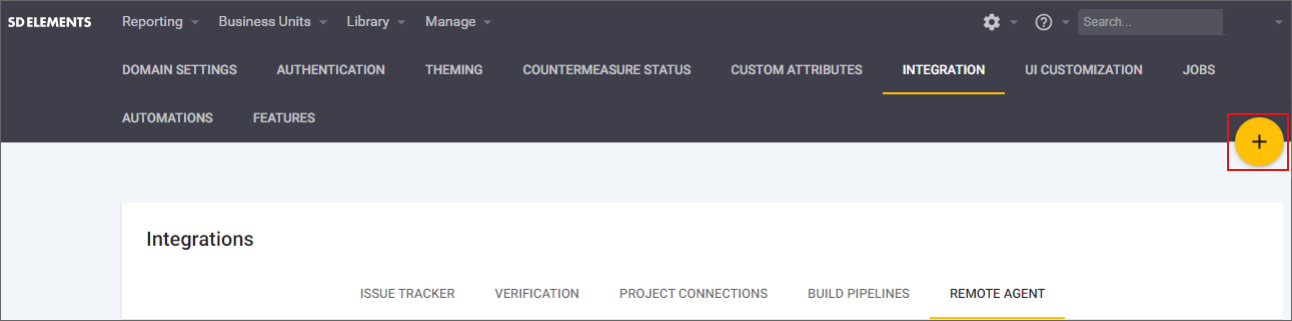
From the gear icon menu, select Integration, then select the Remote Agents tab.
-
To add a new Remote Agent, click the plus button for a New Remote Agent.
-
Select the platform for the Remote Integration Agent, and choose between Windows and Linux.

-
The platform will be updated by the Remote Integration Agent when it runs.
-
Choose the correct platform to receive the download link for the correct installer.
-
-
Enter a name for this Remote Agent. The name provides a descriptive label for the user and is not used during synchronizations.
-
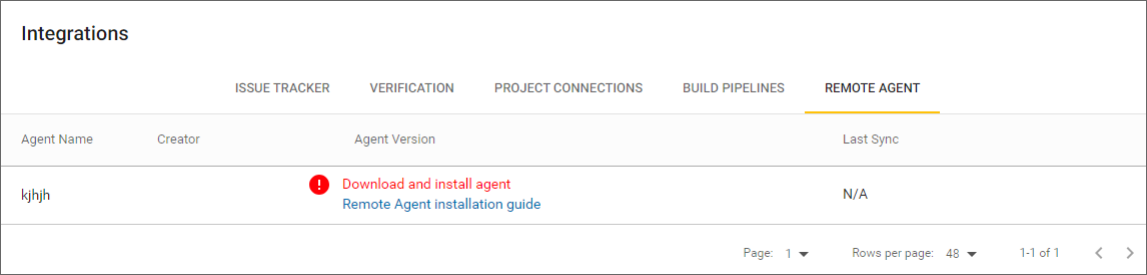
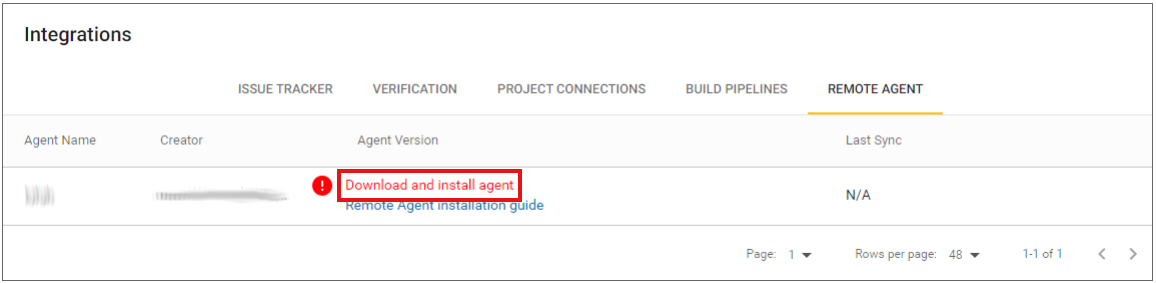
On a newly created Remote Agent, the Agent Version column will show Download and install agent.
-
Click on this warning for download instructions.
-
Only one Remote Agent can be created. Synchronization using multiple remote agents is currently unsupported. After the Remote Integration Agent syncs successfully, this field will show the actual version number, or a warning if the Remote Integration Agent software needs an update. You can permanently delete a Remote Agent by clicking on the icon on the right side.
Create a system connector for an integration
Use the following steps to create a connector to a specific integrations service, such as an Issue Tracker, verification, or LDAP.
Steps:
-
See Integrations for general instructions on creating connectors for specific services.
-
When setting up a connector to use the Remote Integration Agent, select the option: This Issue Tracker server is hosted within a private network and cannot be reached directly by SD Elements.
-
Create project connections, and set Sync Frequency to match the Remote Integration Agent’s scheduled syncs.
| Manual integration is unavailable when a connector is marked as inaccessible. |
SD Elements is ready, but no synchronization jobs will run until the Remote Installation Agent is installed. The next section explains the installation.
Install the Remote Integration Agent
The Remote Integration Agent supports Windows or Linux systems.
| It is recommended that you update your installed Remote Integration Agent client after each SaaS upgrade. |
Windows
The Windows Remote Integration Agent is only compatible with a 64-bit version of the windows operating system.
The installer is available directly from Integrations > Remote Agents in SD Elements once you have added a new remote agent.
The remote integration process runs periodically using the Windows Task Scheduler.
Prerequisites
-
The installation must be run by a user with Administrator permissions.
Steps:
-
From the gear icon menu, select Integration.
-
Select the Remote Agents tab.
-
Click Download and install agent.
-
Run the installer and complete the installation using the wizard.
-
Configure the integration:
-
Click on the link on the Remote Agents page in SD Elements to download the installer.
-
Run the downloaded executable and the installation wizard will start.
-
If the Remote Integration Agent has been installed previously on this server, uncheck the box next to Generate Quickstart Configuration to use a previously created configuration.
-
If this is the first time the Remote Integration Agent has been installed on this server, check the box next to Generate Quickstart Configuration to generate a new configuration. The installation wizard will guide you through the configuration.
This configuration includes multiple prompts for the credentials required to create Windows Task Scheduler jobs for the supported time periods (Hourly, Daily, Weekly, and Monthly). These jobs manage the integrations over those time periods and are required fields.
-
-
Once configured, the Remote Integration Agent installation will complete.
-
Enter the user’s password when prompted.
Once the Remote Integration Agent is installed, the synchronization jobs will run as scheduled.
Edit the configuration
If you make a mistake during installation, you may still edit the configuration file manually.
The configuration is in a text file called config.txt in the directory where the Remote Integration Agent was installed.
Test remote integration or run a manual integration
The installation of the Windows Task Scheduler jobs allows for integration to occur at the time periods configured in the project connectors in SD Elements. No further action is required for any scheduled integrations.
However, to synchronize projects manually or test remote integration after installation of the agent, use the following steps.
Steps:
-
Have at least one project in SD Elements whose project connector is configured to run manually.
-
Run the
integrate.batbatch job.-
This is located in the directory where the Remote Integration Agent was installed.
-
Any issues or errors are reported in messages.log in the same directory.
Linux
The installer is available directly from Integrations > Remote Agents in SD Elements once you have added a new remote agent.
The Linux Remote Integration Agent is distributed as a set of wheel packages that are preferably installed in a Python Virtual Environment. This enables the Remote Integration Agent to be installed without modifying the system’s Python installation.
| Where a version is indicated within angle brackets (<>), use your own version of the Remote Integration Agent. |
| The Linux Remote Integration Agent only supports Python 3.12. Support for Python 3.8 has been deprecated. The installer available in SD Elements supports Python 3.12. |
Prerequisites:
-
Python 3.12 is installed.
Steps:
-
Create a virtual environment for running the Remote Integration Agent. If you are upgrading from a previous version of Remote Integration Agent on the same supported Python version, please skip to Step 2 to activate the virtual environment:
python3.12 -m venv ric-env
-
Activate the virtual environment:
source ric-env/bin/activate
-
Upgrade the version of pip (minimum version 23.3.1 is required):
pip install pip~=23.3.1
-
Ensure that your current working directory contains
remote-integration-<11.0.7>.tar.gz. If not, please navigate to the corresponding directory.ls > remote-integration-<11.0.7>.tar.gz
-
Extract the Remote Integration Agent package and ensure it is accessible to the user running the Remote Integration Agent. Next, enter the extracted directory:
mkdir -p ./sdetools && tar -xzvf remote-integration-<11.0.7>.tar.gz -C ./sdetools && cd sdetools
-
Get the Directory listing:
pwd
> /home/ricuser/sdetools
ls
> dist  sdetools-<11.0.7>-py3-none-any.whl
NOTE: Extracted files in dist/ folder are packages for Python 3.12.
-
Install the wheel package using
pip:pip install --no-index --find-links=dist/ sdetools-<11.0.7>-py3-none-any.whl
-
While the Virtual Environment is activated, you can call the
sdericcommand_driver command:sderic help command_driver
IMPORTANT: In previous versions of SDETools (25.1.0 and below), the command is `sderic.py`.
Once the Remote Integration Agent is installed, you can call the sderic command_driver command to run a synchronization job while the Virtual Environment is activated.
You will need to provide a configuration file for the command to run. You can put this file in the default path ~/.sdetools.cnf. To specify a location for this file, use sderic command_driver -c <path-to-your-config>. Here is a sample configuration file.
|
[global]
# APIv2 connection string
sde_api_token=<token>@<sdelements.instance.com>

# Remote Integration Agent ID
ria_id=<ria id>

# Debug options
#    log_level: default, verbose, debug, error, quiet
#    debugmods: module name
log_level=default
#debugmods=sdetools.sdelib.restclient

# Add additional options to the commands
sde_validate_cert=True
command_params={"issue_tracker_validate_cert":"True", "analysis_validate_cert":"True", "ldap_validate_cert":"True", "sync_comments": true}
Schedule ongoing integration
Windows
-
The Remote Integration Agent relies on the Windows Task Scheduler for scheduled integration runs. During installation, the installer will prompt a user to automatically create Windows Task Scheduler entries for hourly, daily, weekly, or monthly frequencies.
Linux
-
By using the filtering options outlined above, it is possible to schedule ongoing integration to match the SD Elements user interface.
-
On Unix-like environments, the following crontab can be used to run jobs consistent with the UI. In the terminal type:
crontab -e
-
Then paste the following crontab:
# Hourly (On the hour)
0 * * * * [virtualenv path]/bin/python [virtualenv path]/bin/sderic command_driver --sde_api_token=APIv2_CONNECTION_STRING --filter_frequency=hourly > /path/to/output.log 2> /path/to/debug.log
# Daily (1230)
30 0 * * * [virtualenv path]/bin/python [virtualenv path]/bin/sderic command_driver --sde_api_token=APIv2_CONNECTION_STRING --filter_frequency=daily > /path/to/output.log 2> /path/to/debug.log
# Weekly (Mondays at 0130)
30 1 * * 1 [virtualenv path]/bin/python [virtualenv path]/bin/sderic command_driver --sde_api_token=APIv2_CONNECTION_STRING --filter_frequency=weekly > /path/to/output.log 2> /path/to/debug.log
# Monthly (First of the month at 0230)
30 2 1 * * [virtualenv path]/bin/python [virtualenv path]/bin/sderic command_driver --sde_api_token=APIv2_CONNECTION_STRING --filter_frequency=monthly > /path/to/output.log 2> /path/to/debug.log
-
Update the paths to reflect the relevant locations.
Network Restrictions
Network restrictions can be configured to mitigate Server-Side Request Forgery attacks, which help to prevent exposing access to internal resources if you do not have network level protection.
By default, these restrictions are disabled for the Remote Integration Agent because in typical deployments the Agent will require access to internal integration services. Consider network layer protections to secure the Remote Integration Agent environment from SSRF attacks.
Enabling network restrictions will have the following effects:
-
Block access to IPv6 addresses
-
Block access to multicast, link-local, loopback, IETF reserved, and private network addresses
-
Block access to restricted hosts (default: localhost)
-
Block access to restricted ports (default: 22, 23)
Any integration job that attempts to access a restricted address directly or via a redirect will fail.
The set of restricted hosts and ports can be configured. In the configuration file, add or modify the following lines to the desired values:
ignore_internal_network_restriction=False
network_restriction_domain_block_list=example.com
network_restriction_port_block_list=22,23
Windows
-
On Windows, the restrictions can be configured during the installation step or by modifying the
config.txtfile afterwards.
Linux
-
On Linux, modify the config file used in the installation step. The default location is
`~/.sdetools.cnf.